
13August 2026
Weather stripping is one of the simplest ways to reduce drafts around exterior doors and operable windows. It seals the small gaps between a door or window and its frame, helping keep cold air outside and warm air inside.
In my experience as a Toronto downtown handyman, homeowners often assume a draft means they need a new door or window. Many times, the actual problem is much smaller: a worn door sweep, flattened compression seal, peeling adhesive foam, or a door that needs a minor adjustment.
The key is to identify where the air is entering before replacing anything.
What Is Weather Stripping?
Weather stripping is a sealing material installed around movable doors and windows. When the opening is closed, the material fills or compresses against the gap to reduce air leakage.
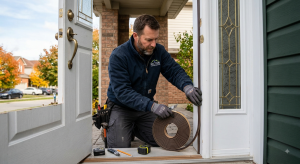
Common types I inspect and replace include:
- Door sweeps installed along the bottom of exterior doors.
- Adhesive-backed foam tape used around older doors and windows.
- Compression seals installed around exterior door frames.
- V-strip used around certain windows and older door installations.
- Rubber and vinyl window seals that have become worn or damaged.
Each type has a different purpose and installation method. A replacement needs to match the size of the gap, the way the door or window moves, the installation surface, and the amount of compression required.
Buying a replacement based only on what the old strip looks like is one of the most common mistakes I see.
Signs Your Weather Stripping Needs Replacement
Visible daylight around the opening
One of the clearest signs of failed weather stripping is visible daylight around a closed door or window.
With an exterior door, check the bottom corners, latch side, hinge side, and the area where the door meets the frame. If you can see light underneath the door or along one side, air can usually enter through the same opening.
A small gap may not seem serious during mild weather, but it can create a noticeable cold draft during a Toronto winter.
Cold drafts near doors or windows
Feeling cold air around a closed door or window is another common warning sign. Move your hand slowly around the perimeter rather than checking only one spot.
Pay particular attention to:
- The bottom and latch side of exterior doors.
- The corners where weather stripping meets.
- The meeting point between a window sash and frame.
- Areas where the seal appears loose or uneven.
- Transitions between the frame, threshold, and surrounding wall.
A draft is not always strongest where the problem begins. Air can travel through the frame or along a cavity before entering the room, so I try to locate the exact path rather than automatically replacing the most visible strip.
Cracked, hardened, or flattened seals
Weather stripping should remain flexible enough to make consistent contact when the door or window is closed. Over time, rubber and vinyl can harden, crack, tear, or flatten.
An older seal may still appear to be in place but no longer work properly. If the material feels stiff instead of flexible, or if it remains crushed and does not spring back, it may have reached the end of its useful life.
Door sweeps experience particularly heavy wear because they drag across the threshold every time the door opens and closes. The rubber or vinyl may crack, flatten, or wear down unevenly.
Peeling or loose adhesive weather stripping
Adhesive-backed foam tape is inexpensive and convenient, but it can fail quickly if the surface is dirty, damp, or covered with old adhesive.
Look for:
- Edges that are peeling away from the frame.
- Sections that have shifted out of position.
- Gaps between pieces of foam.
- Foam that has become compressed or brittle.
- New material installed over old, loose weather stripping.
I have seen homeowners add several layers of adhesive foam in an attempt to stop a draft. This usually creates a messy installation and may prevent the door or window from closing properly. The better approach is to remove the old material, clean the surface thoroughly, and install the correct replacement.
Weather stripping should be installed on clean, dry surfaces so the adhesive can bond properly.
Uneven contact when the door or window closes
When a door or window is closed, the weather stripping should make reasonably consistent contact around the opening.
If one section is heavily crushed while another section is not touching at all, the problem may involve more than a worn seal. Possible causes include:
- A door that has dropped slightly on its hinges.
- Loose or worn hinges.
- An uneven or damaged threshold.
- A frame that is not square.
- Weather stripping that is too thick or too thin.
- Incorrect installation or poor alignment.
Installing thicker weather stripping may seem like an easy solution, but it can make the door difficult to close without correcting the underlying problem.
The door feels loose when closed
An exterior door that moves slightly after closing, rattles in the frame, or does not pull tightly against the seal may have worn compression weather stripping or a latch alignment problem.
Compression seals are designed to compress when the door closes. With age, they can become hard, flattened, cracked, or damaged. The door may still look normal, but small gaps can develop around the frame.
Check whether the latch is pulling the door firmly against the seal. If it is not, replacing the weather stripping alone may not solve the issue.
Higher heating bills or colder rooms
A draft does not always announce itself with a large visible gap. Sometimes the first sign is a room that feels colder than the rest of the home or heating costs that seem unusually high.
Cold spots near exterior doors and windows are especially noticeable when the outdoor temperature drops. Weather stripping is intended to minimize air leakage through movable connections, which can improve comfort and reduce drafts.
However, higher heating costs can have many causes. I would not recommend replacing weather stripping based only on a utility bill. Use the bill as a reason to inspect the openings, then confirm where air is actually entering.
How I Check for Weather-Stripping Problems
Inspect the perimeter for gaps
I start with a visual inspection while the door or window is closed. I look for daylight, gaps at the corners, damaged sections, and places where the strip has pulled away from the frame.
On an exterior door, the bottom corners and latch side often reveal problems first. I also check whether the sweep makes continuous contact with the threshold.
Feel for air movement
Next, I slowly move my hand around the edges. This can reveal a subtle draft that is not visible.
A seal may work properly on three sides while leaking on the fourth. That is why I check the full perimeter instead of assuming the coldest-feeling area is the only problem.
Use a tissue or light smoke test
For a small or difficult-to-find leak, I may use a tissue or light smoke test. If the tissue moves or smoke is disturbed near a particular section, it helps identify the path of the air.
This simple test can save a lot of guesswork. It is important to use caution with any flame or smoke near combustible materials, curtains, and finishes.
Check the contact pattern
I examine how the weather stripping is contacting the door or window. Even contact is usually a good sign. Uneven contact suggests that the seal may be installed incorrectly or that the opening is out of alignment.
A door that has dropped slightly may compress the seal heavily at one corner while leaving a gap at another. In that situation, the door needs to be adjusted before choosing a replacement seal.
Inspect the material itself
Finally, I check the condition of the weather stripping by looking for:
- Cracks or splits.
- Hardening or loss of flexibility.
- Flattening and permanent compression.
- Tears or missing sections.
- Peeling adhesive.
- Gaps where pieces meet.
- Damage caused by rubbing against the threshold or frame.
Sometimes I can identify a failed seal simply by touching it. An older rubber or vinyl seal may look intact but feel hard and inflexible.
Two Toronto Weather-Stripping Problems I Diagnosed
A front door that did not need replacement
One job that stands out involved an older downtown Toronto home. The homeowner believed the front door had warped because they could feel a cold draft around the latch side and along the bottom. The door also felt loose when closed, and they were considering replacing the entire unit.
When I inspected it, the door itself was in reasonable condition. The main issue was that the compression weather stripping had become hard and flattened with age. It was no longer compressing evenly around the frame. The door sweep underneath was also worn.
I replaced the damaged compression seal, adjusted the sweep, and checked the hinges and latch alignment. Once the door was pulling tightly against the new seal, the draft disappeared.
The homeowner did not need a new front door. They needed the existing door to seal and operate properly.
A condo window with poorly installed foam tape
Another example involved a Toronto condo where the homeowner felt cold air around a bedroom window. They suspected that the window unit itself had failed and were concerned about the cost of replacement.
I first checked where the air was actually entering. The adhesive-backed weather stripping had been installed poorly. In some areas it had started peeling away, while another section had been compressed so much that it no longer contacted the moving part of the window.
I removed the old material, cleaned the surfaces properly, installed the appropriate replacement seal, and checked the window’s closing pressure. The difference was immediate.
This is why I do not recommend automatically blaming the door or window when you feel a draft. A relatively small repair can sometimes solve what initially appears to be an expensive replacement problem.
Common Weather-Stripping Mistakes
Choosing a replacement by appearance alone
Weather stripping comes in different profiles, thicknesses, materials, and installation methods. Two products may look similar but perform very differently once installed.
The replacement must match:
- The size of the gap.
- The amount of compression required.
- The movement of the door or window.
- The surface where it will be installed.
- The exposure to weather and repeated use.
If the material is too thick, the door may become difficult to close. If it is too thin, the draft may continue.
Installing new material over old material
Adding new weather stripping over an existing layer can interfere with the operation of a door or window. It may also hide the real problem instead of fixing it.
I prefer removing the old material completely, cleaning the surface, and starting with the correct seal. A clean installation is usually more effective and lasts longer.
Skipping surface preparation
Adhesive-backed products require a clean, dry, reasonably smooth surface. Dust, dirt, old adhesive, and moisture can cause the new strip to peel away soon after installation.
A job may look successful on the first day but fail quickly if the surface was not prepared properly. Removing old residue and allowing the area to dry are important parts of the repair, not optional extra steps.
Using weather stripping to fix alignment problems
Weather stripping cannot compensate for every door or window problem. If a door is sagging, the hinges are loose, the frame is not square, or the threshold is damaged, a new seal may not solve the draft.
In some cases, installing thicker material makes the door harder to operate while leaving the original gap in place. The underlying alignment or hardware issue needs to be addressed first.
Can You Replace Weather Stripping Yourself?
A homeowner can often handle a straightforward replacement when the door or window is already aligned and operating normally.
DIY may be reasonable when:
- You are replacing a standard door sweep.
- You are installing simple adhesive foam on a clean surface.
- The existing opening closes and latches correctly.
- The gap is consistent and easy to measure.
- You are comfortable using basic tools.
Before starting, measure the opening carefully, remove the old material, clean and dry the surface, and check that the door or window still operates smoothly after installation.
It is best to call a handyman when:
- The door is sagging or has uneven gaps.
- The door does not latch or pull tightly against the frame.
- The hinges or threshold need adjustment.
- The window does not close squarely.
- You cannot identify the correct seal profile.
- A replacement seal has not stopped the draft.
- You suspect deteriorated caulking, frame gaps, or water damage.
If you have already replaced the weather stripping and the draft remains, something else may be allowing air to enter. The cause could be a damaged threshold, poor alignment, deteriorated caulking, a gap in the frame, or another part of the opening.
When Should You Inspect Weather Stripping?
I recommend that Toronto homeowners inspect weather stripping every fall before the cold weather arrives. Exterior doors, patio doors, and frequently used windows deserve particular attention.
Early fall—roughly September and October—is usually the best time to replace worn weather stripping. The weather is more comfortable for working, and the repair can be completed before the heating season is fully underway.
During your inspection, look for:
- Cold drafts.
- Visible daylight.
- Cracked, hardened, or flattened seals.
- Peeling adhesive.
- Uneven contact around the opening.
- Doors or windows that are difficult to close.
- Loose sweeps or damaged thresholds.
Do not wait until fall if you notice a noticeable draft in January. A winter repair is still worthwhile, especially if a room is uncomfortable or cold air is entering around an exterior opening.
Final Advice for Toronto Homeowners
Good weather stripping is about more than potentially reducing heating costs. In a Toronto winter, a properly sealed door or window can make a room noticeably more comfortable by eliminating cold drafts and reducing cold spots around the opening.
My main advice is simple: inspect in the fall, repair drafts early, and diagnose the cause before replacing anything.
A worn door sweep, failed compression seal, loose hinge, or alignment problem can sometimes make a perfectly serviceable door or window appear ready for replacement. In many cases, a smaller repair can solve the problem and save the homeowner from a much more expensive project.
If the door or window is operating properly and the weather stripping is visibly worn, replacement may be a manageable DIY job. If the opening is out of alignment, difficult to close, or still leaking after replacement, it is worth bringing in a handyman to correct the root cause.